
Sending and sharing Ecommerce data is a new and important feature of GA4. Setting up Google Analytics 4 for eCommerce might seem tricky, but it’s essential for valuable insights. Unlike an automatic data collector, you need to configure it for your reports. The benefits are significant.
GA4 eCommerce data is a game-changer. It shows how customers engage with your products. It offers insights to enhance their shopping experience. It highlights what drives conversions and guides you for a better marketing strategy.
Need a simple guide? This article’s got you covered. We’ll look through the steps to set up GA4 eCommerce and explore the perks of tracking eCommerce data for your business. Let’s get started!
Enabling eCommerce tracking in Google Analytics 4
Follow the steps given below to enable eCommerce tracking in GA4.
- Make sure your website has features like product pages, checkout pages, shopping carts, and buttons for eCommerce data collection.
- Make sure you have both a Google Analytics account and a Google Analytics 4 account. If not, create a new one.
- Choose a method for eCommerce analytics data collection: either (gtag.js) Global Site Tag or (GTM) Google Tag Manager. These methods help set up tags to send eCommerce data from the app or website to your GA4 property. If you’re unsure, learn the differences between gtag.js and Google Tag Manager.
GTM Vs. gtag.js
Google Tag Manager (GTM) and Global Site Tag (gtag.js) are two methods for deploying tags in Google Analytics, each with its unique approach.
Google Tag Manager is a user-friendly web-based system that simplifies updating Google and third-party tags in your apps or websites without extensive coding. It also offers collaboration features and version control.
In contrast, Global Site Tag (gtag.js) is the JavaScript framework that allows you to directly add tags to your web pages or mobile apps. Unlike Google Tag Manager, gtag.js enables continuous use of JavaScript code to send data to Google Analytics.
We’ll focus on using GA4 with Tag Manager as we consider it a better option. Tag Manager is compatible with various tracking tools, is user-friendly, and offers more functionalities.
Set up GA4 eCommerce using GTM
Since Tag Manager is user-friendly, efficient, and secure, it’s the preferred choice. Using GTM can minimize errors, enhance tag deployment, and unlock additional features through a simple web interface. Now, let’s look at the steps to set up GA4 with GTM:
Installing GTM on your Web Pages or Apps
To add Tag Manager to your website, insert a small code snippet on the web pages. This code lets your site interact with Google Analytics and Google Tag servers.
The Google Analytics 4 configuration tag code manages GA4 tag settings, configures cookies, and transmits automatically collected & improved measurement events.
Utilizing Tag Manager on your mobile apps lets you track user interactions with your eCommerce products and app. It also lets you make app adjustments without rebuilding and resubmitting codes to app stores.
How to install a GTM container on the eCommerce site?
To set up GTM containers on your eCommerce site, you’ll need access to your mobile code or website. Follow these steps:
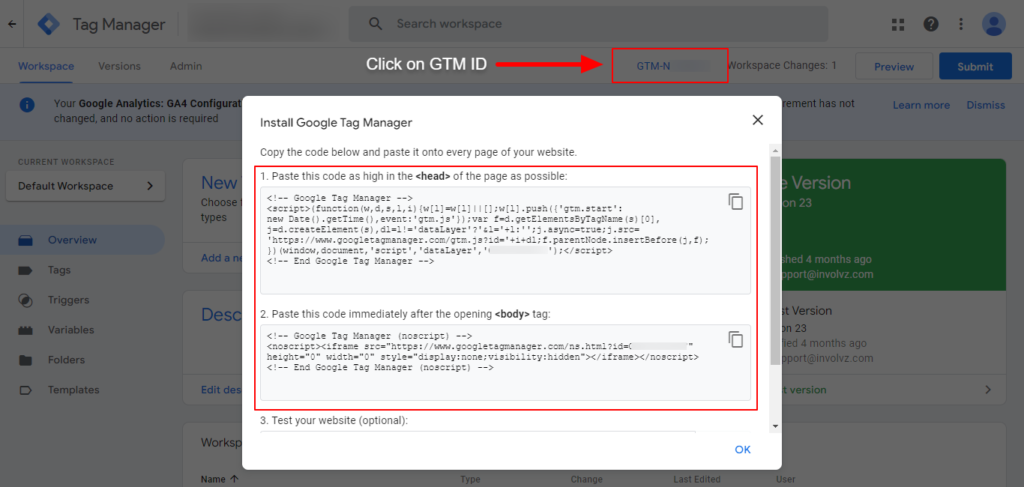
- In GTM, go to the Workspace.
- Click on the container ID (formatted as GTM-XXXXXX) on the right side of the Workspace tab.
- Clicking on this ID will open the Install Tag Manager box.
- Follow the guidance in an Install Tag Manager box: Copy & paste the provided code snippets onto the web pages. Specifically, insert the copied <script> code into the <head> of the web page HTML, and place <noscript> code right after a <body> tag.
Switching to GTM
If you previously used Global Site Tags for eCommerce tracking and are shifting to GTM, it’s advisable to migrate the majority, if not all, of your existing tags to GTM. This ensures a seamless transition and enables efficient management of your tracking configurations within Google Tag Manager.
Understanding the eCommerce interactions to track on the app or site
Understanding eCommerce interactions on your website or app involves monitoring user actions related to your products or services. Key events to track include
- Viewing products
- Selecting items
- Cart additions/removals
- Checkout initiation
- Promotions viewed
- Promotion Applied
- Purchases
- Refund requests
Google Analytics (GA4) defines events in two categories:
Automatically collected and manually set events. Manually set events comprise recommended (predefined by Google Analytics) and custom events (user-defined for specific analysis).
Given that most eCommerce events are recommended, the focus shifts to collecting these using Google Tag Manager. This targeted approach ensures you track the essential actions that matter for insightful eCommerce analysis.
Setting up GA4 eCommerce events with the GTM
Once Google Tag Manager is installed on your website, configure Google Analytics 4 eCommerce events within the Tag Manager by adding the right triggers and tags. Recommended eCommerce events have predefined names and parameters. They enable detailed measurements of user interaction.
GTM represents services or products as an array of products within eCommerce events, They accommodate prescribed and around 27 custom parameters. Additionally, you can make collections of the item arrays, allowing around 200 elements for comprehensive eCommerce tracking.
Steps for creating and configuring Google Analytics 4 eCommerce event tags
To initiate Google Analytics 4 eCommerce events in GTM, start by configuring a GA4 Event tag. This tag empowers you to establish tailored rules for collecting precise data from your app or site.
Create custom macros to allow GTM to dynamically extract data from the product pages, including prices and item names. Once set up, GTM containers on your website transmit this data to the Tag Manager.
Here are the steps to create and configure a new GA4 eCommerce event tag in Google Tag Manager:
- In GTM, click on “Tags” in the side menu, then select “New.”
- Name your event in the New Tag box, e.g., “purchase.”
- Choose “Google Analytics: GA4 Event” as the tag type.
- Set up new eCommerce Data Layer variables. Navigate to “Variables,” click “New” under the User-Defined Variables, and enter the Variable Name and corresponding DataLayer Variable Name for each, like Ecommerce Items – ecommerce.items. Save each configuration. Variables include:
- Ecommerce Transaction ID – ecommerce.transaction_id
- Ecommerce Items – ecommerce.items
- Ecommerce Tax – ecommerce.tax
- Ecommerce Value – ecommerce.value
- Ecommerce Currency – ecommerce.currency
- Ecommerce Shipping – ecommerce.shipping
- Ecommerce Coupon – ecommerce.coupon

5. Once you’ve configured the variables, proceed to add the event parameters within the Parameter Name – Value pairs located below the New Tag box. Additionally, be sure to check the “Send Ecommerce Data” box below More Settings.
Assign your event parameters using the following format:
- transaction_id – {{Ecommerce Transaction ID}}
- items – {{Ecommerce Items}}
- value – {{Ecommerce Value}}
- shipping – {{Ecommerce Shipping}}
- tax – {{Ecommerce Tax}}
- coupon – {{Ecommerce Coupon}}
- currency – {{Ecommerce Currency}}

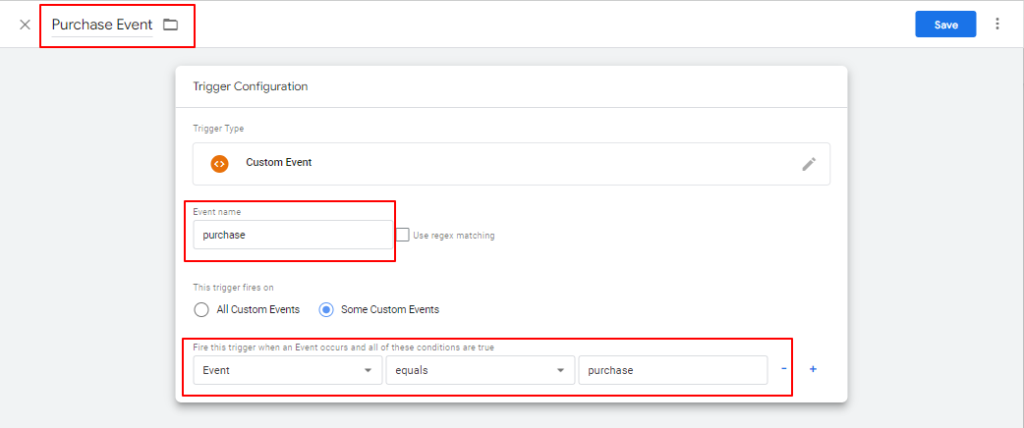
6. Ultimately, set up your trigger to activate with every site event. In the Trigger Configuration box, input Event Name as a “purchase,” select Trigger Type as a Custom Event, and set it to fire on specific events. Specify the trigger condition as “Event equals to purchase” & save your modifications.
Testing Google Analytics 4 eCommerce configuration and setup
After setting up GA4 eCommerce events, it is important to preview the changes right before publishing them live. Use Tag Manager’s Preview mode to test your GA4 setup for tracking eCommerce data accurately. Follow these steps:
- Click “Preview” in GTM to open Google Tag Assistant in the new tab. Resolve any configuration errors that Tag Manager identifies.
- Enter your website’s URL, where you installed the Tag Manager container.
- Debug with Tag Assistant if errors persist, addressing issues like incorrect triggers.
- Save changes until tracking aligns with expectations.
After successful testing, publish your workspace by clicking “Submit” and entering the Version Name and Description. Access Realtime & DebugView reports in Google Analytics for instant monitoring of user activities on your site.
Analyzing eCommerce data in GA4
Now that GA4 eCommerce tracking is active, delve into analyzing your customer’s buying behavior. Extract valuable insights to personalize experiences, make informed business decisions, and address potential risks. Combine eCommerce reports with other marketing channels for a holistic view, identifying trends and optimizing your eCommerce strategy.
The Important Role of GA4 eCommerce for Business
Setting up Google Analytics 4 for eCommerce is a pivotal step, offering a range of benefits that significantly impact your business operations.
1. Accurate and Swift Tracking:
GA4 eCommerce outshines Universal Analytics by providing more precise and faster tracking of eCommerce events. Its enhanced features allow for tracking relevant metrics with minimal impact on site or app speed, ensuring a seamless customer experience while collecting crucial business data.
2. Cross-Device Interaction Tracking:
GA4 eCommerce enables tracking customer behavior across various devices—desktop, tablet, or mobile. This unified interface provides insights into how customers interact with your site on different devices. While this is particularly valuable for stores with mobile apps, it offers a comprehensive view of any online store.
3. Advanced Reporting Features:
GA4, compared to Universal Analytics, offers more powerful and user-friendly features. It allows deep insights into eCommerce data, facilitating tracking of customer journeys from product views to purchases. The robust GA44 API enables data export to third-party platforms like Tableau, Power BI, or Qlik for advanced analysis.
4. Improved Integration Capabilities:
GA4 seamlessly integrates with various Google ecosystem products and third-party tools. This integration flexibility enhances how you interpret and utilize your eCommerce data. For instance, integrating GA4 with Google Ads provides insights into ad performance, optimizing campaigns based on eCommerce data. This integration ensures better results and increased ROI from advertising efforts.
Final Words!
Setting up Google Analytics 4 for eCommerce is an indispensable process that unlocks a bundle of benefits for businesses. The accuracy and speed of tracking offered by GA4 eCommerce surpass Universal Analytics, providing more relevant metrics without compromising the user experience. The ability to track cross-device interactions, coupled with advanced reporting features, empowers businesses to understand customer behavior comprehensively. The improved integration capabilities, especially with Google Ads, enable businesses to optimize marketing campaigns effectively.
As the eCommerce landscape evolves, embracing GA4 becomes not just a necessity but a strategic move toward data-driven decision-making and overall business success. The step-by-step guide outlined here aims to simplify the setup process and highlight the significance of leveraging GA4 for robust eCommerce analytics.
Read Our Latest Guides on GA4: