WooCommerce is a widely used e-commerce platform that allows businesses to establish and oversee their online stores. To achieve efficient monitoring of marketing campaigns and gain insights into user behavior, incorporating UTM tracking becomes imperative.
UTM (Urchin Tracking Module) parameters are special tags appended to URLs, offering valuable data on the source, medium, and campaign responsible for directing traffic to your website. In this comprehensive guide, we will take you through the step-by-step process of integrating UTM tracking into your WooCommerce store, enabling you to optimize marketing strategies and boost overall performance.
Achieving this goal involves two primary components:
- Capturing UTM Parameters
- Sending UTM tags within WooCommerce orders.
- Capturing UTM parameters
Capturing UTM parameters involves employing different approaches, such as using JavaScript code snippets on your website or leveraging tools like Google Tag Manager (GTM). GTM offers a convenient solution for capturing UTM parameters, particularly when you need to apply the same method across multiple websites without the ability to directly edit their code. By creating user-defined variables in GTM, you can efficiently gather and analyze UTM data, gaining valuable insights into your marketing efforts and obtaining a clearer understanding of your website traffic sources.
GTM Variables
To capture the UTM parameters effectively, we must set up specific user-defined variables in GTM. These variables should have the following exact names as provided. In cases where UTM parameters are not present, we’ll resort to utilizing the referrer, but only if it’s available and from an external website.
The custom HTML tag will rely on these variables to function correctly, so it’s essential to maintain the specified names for seamless implementation. The following user-defined variables in Google Tag Manager serve specific purposes:
- “url – utm_source”: Capture the value of a utm_source parameter.
- “url – utm_medium”: Capture the value of a utm_medium parameter.
- “url – utm_campaign”: Capture the value of a utm_campaign parameter.
- “url – hostname”: Returns the website’s hostname and is employed to prevent sending the referrer information in cases of internal traffic(users navigating within your website).
- “referrer – full”: Acts as a source when not even a single UTM parameter is available.
Create a Custom HTML tag that Captures UTM Parameters.
To track different marketing campaigns, create a unique HTML Tag with the UTM parameters. We should develop a custom HTML tag that is responsible for capturing UTM parameters or a referrer (in case no UTM tags are present). Once captured, the data will be stored in the sessionStorage. Below, you’ll find the code snippet for implementation.
<script>
var source = sessionStorage.getItem('source');

if ({{url - utm_source}}) {
source = {{url - utm_source}} + ' / ' + {{url - utm_medium}} + ' / ' + {{url - utm_campaign}};
sessionStorage.setItem('source', source);
}
else if ((!source) || (source == 'none')) {
if (({{referrer - full}}) && (!{{referrer - full}}.includes('{{url - hostname}}'))) {
source = {{referrer - full}} + ' / referral';
sessionStorage.setItem('source', source);
}
else {
source = 'none';
sessionStorage.setItem('source', source);
}
}
</script>
For example, “cHTML – source to sessionStorage” is a customized tag but feel free to modify it as needed. Here’s how it should appear:
The purpose of this GTM (Google Tag Manager) tag is to capture the UTM parameters and store them in the sessionStorage.
Related : Segment VS Google Tag Manager
If there are no UTM tags and no referrer, set the source as none. I set this default value to be able to tell apart cases when the code does not run correctly for some reason, in which case we expect the source to be empty (or undefined).
The logic behind it is structured as follows:
- If UTM parameters are present, we will store the source using the values of utm_source/utm_medium/utm_campaign
- In the absence of UTM tags, and if a referrer is present there (indicating the visitor visits from the external website), we will save the source as “https://any-website.com/referring-page / referral”.
- If both UTM tags and referrer are not present, we will set source as “none.” This default value helps distinguish cases where the code doesn’t execute correctly, as we anticipate that the source will either be empty or undefined in such cases.
Sending UTM Tags within WooCommerce Orders.
With the UTM tags now saved in the session storage, the next step is to transfer this information to WooCommerce orders by creating a custom field. To achieve this, you’ll need to add a hidden field on the checkout page and populate it with the value of the UTM tags.
By implementing this method, the UTM data will be captured in a hidden field during the customer checkout process. Once the order is completed, this information will be saved as a custom field linked to the specific order. As a result, you will be able to preserve the UTM details for each order, facilitating tracking and analysis purposes.
Establish the Hidden field Within the WooCommerce Checkout Page
For the purpose of adding a hidden field in a WooCommerce checkout page, use a code snippet instead of relying on plugins, as they might have been excessive for specific requirements.
To implement the hidden field, simply insert the provided code snippet into your website.
// Add a hidden field on the checkout page

add_action('woocommerce_after_order_notes', 'checkout_source_field');

function checkout_source_field( $checkout ) {

woocommerce_form_field( 'my_source_field', array(

'type' => 'text',

'required'=> false,

'placeholder' => __('utm_source'),

), $checkout->get_value( 'my_source_field' ));

}

// Update the order meta with field value

add_action('woocommerce_checkout_update_order_meta', 'checkout_source_field_update_order_meta');

function checkout_source_field_update_order_meta( $order_id ) {

if ($_POST['my_source_field']) update_post_meta( $order_id, 'Source', esc_attr($_POST['my_source_field']));

}
If you choose to utilize the Code Snippets plugin, the process would appear like this:
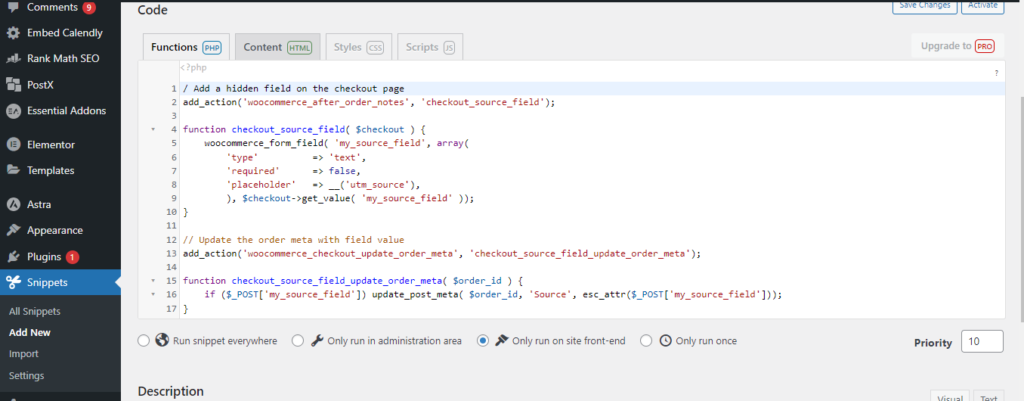
This will enable you to create a hidden field on the WooCommerce checkout page.
Retrieve UTM Tags from WooCommerce Checkout field
To proceed with GTM, you must create the tag that exclusively fires at the checkout page. This tag will be responsible for obtaining the UTM parameter values through session storage and subsequently setting them in a source field within the WooCommerce checkout page.
Assuming your WordPress website’s checkout page web address is similar to this: “https://your-website.com/checkout/,” the trigger provided below should work without any adjustments. However, if the URL structure differs, you might need to modify the trigger accordingly.
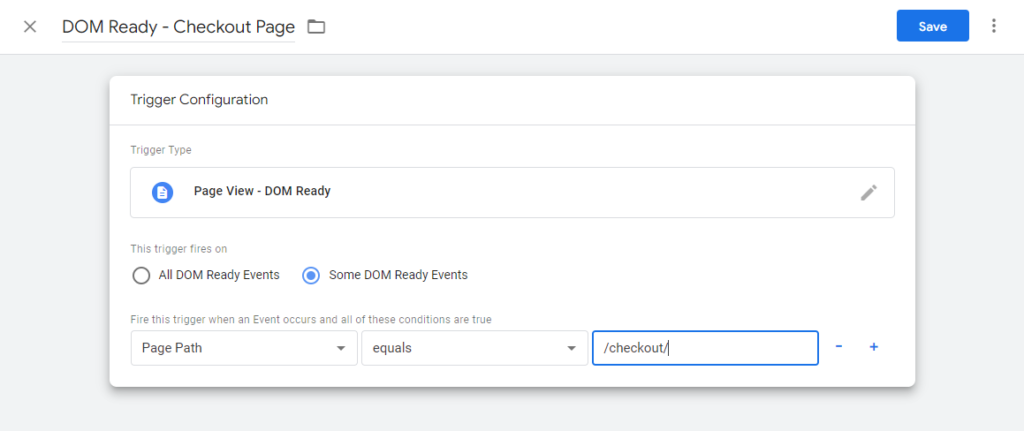
Create the DOM Ready trigger within the Checkout Page
We opt to use “DOM Ready” rather than “Page View” because it fires a little later. It ensures that the code will be executed to set a value of a source field during “DOM Ready”. The code responsible for storing the source within the session storage is executed already. This sequential execution guarantees the desired outcome.
We will utilize the condition “Page Path equals /checkout/” to specifically target the checkout page. If the checkout page consists of an alternative address, you can modify this condition accordingly.
The trigger is named as “DOM – checkout page.” After configuring the condition, a trigger will appear like this:
Create the Tag that Transmit the UTM Parameters to the WooCommerce Checkout fiel
Please set up the custom HTML tag which will be triggered by the condition we previously created. You can use the provided code snippet and paste it into your tag configuration.
<script>
// sets the source (UTM parameters) as the value of the hidden checkout field
document.querySelector("#my_source_field").value = sessionStorage.getItem('source');
</script>
The tag is named “cHTML – source to WooCommerce.” In case you’ve also named your tag the same, it should appear like this:

Either in Preview mode of GTM or after you publish the container, visit your website and add the following parameters at the end of the URL: ?utm_source=test_source&utm_medium=test_medium&utm_campaign=test_campaign.
After enabling the “Preview mode” in Google Tag Manager or publishing the container, visit the website & add the given parameters in the end of a URL:
utm_source=test_source&utm_medium=test_medium&utm_campaign=test_campaign.
Once you’ve added the product in your cart & proceed to a checkout page, you are capable of finding an additional field at the bottom of the checkout page displaying the values “test_source / test_medium / test_campaign.”
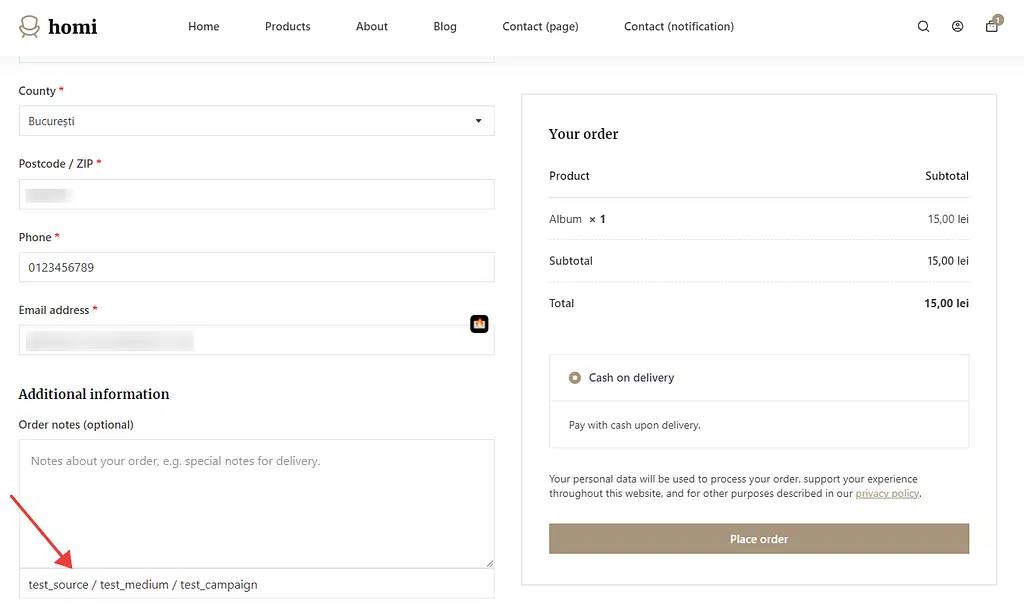
For debugging purposes, the field is intentionally visible. Once you’ve completed your testing, remember to switch the field value from “text” to the “hidden.”
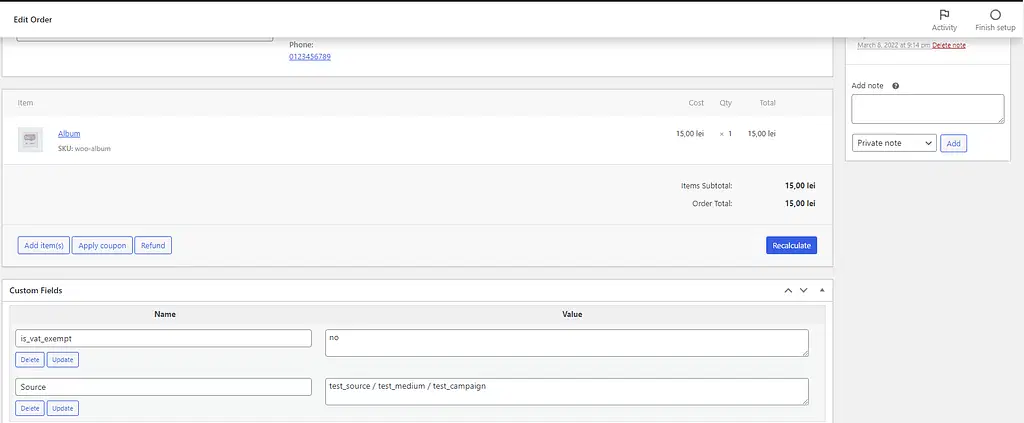
Once you place the order, you will not notice anything different. That’s intended, as the source should be visible to the website owner, not to the customer. Going into the WordPress admin dashboard to edit the order, we can now see the value of the source field as in this screenshot.
After placing the order on the page, you won’t observe any noticeable changes on the front-end, which is intentional. The visibility of the source field is meant for the owner of the website, not the customer. When accessing the admin dashboard for editing the order, you will be able to view the value of a source field, such as illustrated in the provided screenshot.
Great job! You have captured a source of the visit, either through UTM parameters or referrer, and transmit it to the WooCommerce orders. This will provide valuable insights for tracking and understanding the origin of your orders.
Read Also : Data Filters Google Analytics 4
Final Words!
Enhancing your WooCommerce store with UTM tracking allows you to access valuable insights regarding your marketing strategies. This feature enables precise tracking of traffic sources, mediums, and campaigns, enabling data-driven decisions for optimizing your online store’s performance and ultimately increasing sales. Follow this step-by-step guide to easily implement UTM tracking in your WooCommerce store and elevate your marketing efforts to new heights.